Advertise here
Revamping scrapped artwork is a great way to improve the skills of any artist. It is a great measure of your improvement and changes in style over time. Back in 2007, I had a caricature drawn of me at an event, which I later used to practice vector styles in Photoshop. Fast forward some years, and I've recreated that old artwork with improved skills as a digital painter. This tutorial will show you how I transformed that old vector illustration into a true digital painting. Let's get started!
Tutorial Assets
The following assets were used during the production of this tutorial.- Old Cartoon (Feel free to use your own)
Step 1
Cut and paste a previously scrapped cartoon into a 1800 x 1650 document at 150 dpi with a white background. Use Free Transform while holding down Shift to make sizing adjustments, then center the image. Trace that image using a high opacity, soft, black brush.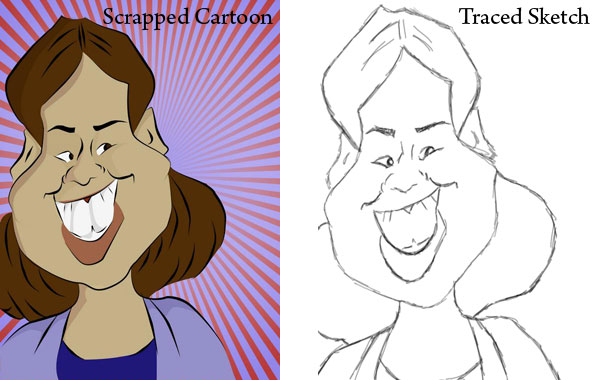
Step 2
Since this cartoon is based on an actual person, quickly collage several photos together of your subject for reference. This reference will help when modifying the trace to look more like the subject. By keeping the reference black and white you can concentrate on just the characteristics of those features. And later on when figuring out how light should fall on the face, you can always reference the collage again.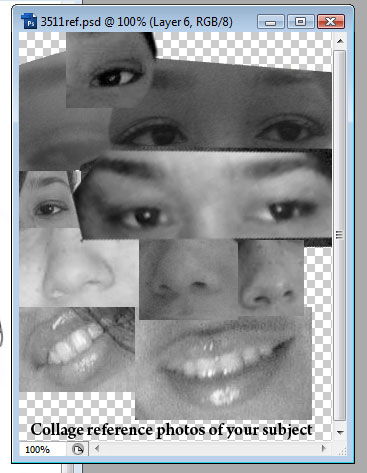
Step 3
Modify your original sketch by using your tablet to redraw features to look more like the subject. In this case, I paid attention to the eyes, nose, and mouth to achieve this effect. Don't worry just yet about making the cartoon more anatomically correct, you can save that for the painting later.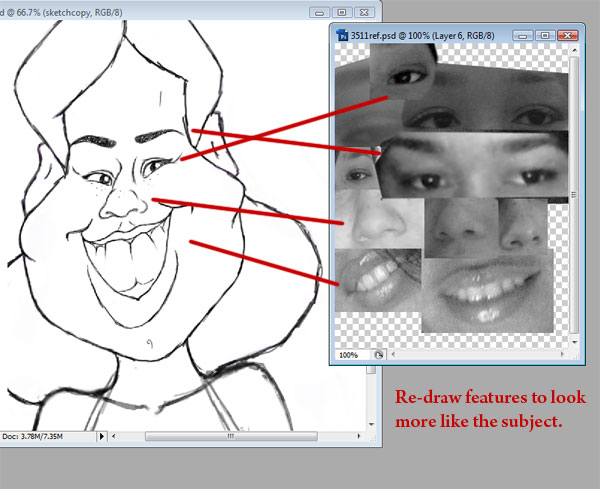
Step 4
For sketching curly hair, draw the curls so that they interact with each other, looping with one another and bunching together. For a quick cheat, draw only one side of the curls and use the Lasso tool to copy and paste a new layer of curls for the opposite side. Flip and rotate the curls so that the copy isn't too obvious, though any similarities will be covered up during the painting process.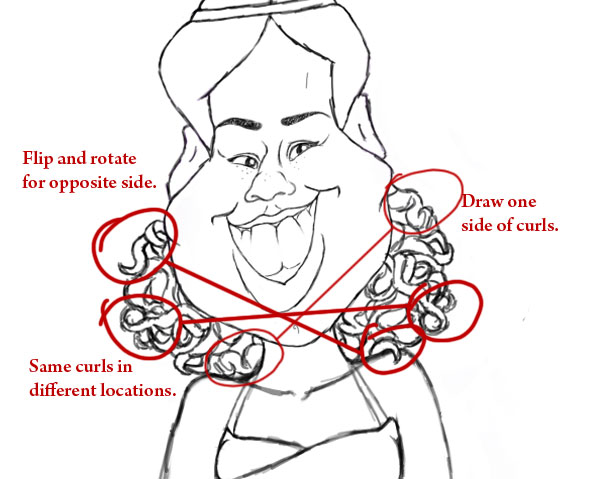
Step 5
Add a new layer. Using the Elliptical Tool, create a large circle behind the cartoon with a stroke of 7 pixels. With the Pen Tool selected, right-click to create a Vector Mask. This circle will enclose the background scenery for the painting. You can leave the extra details for any of these additions until we start painting the image.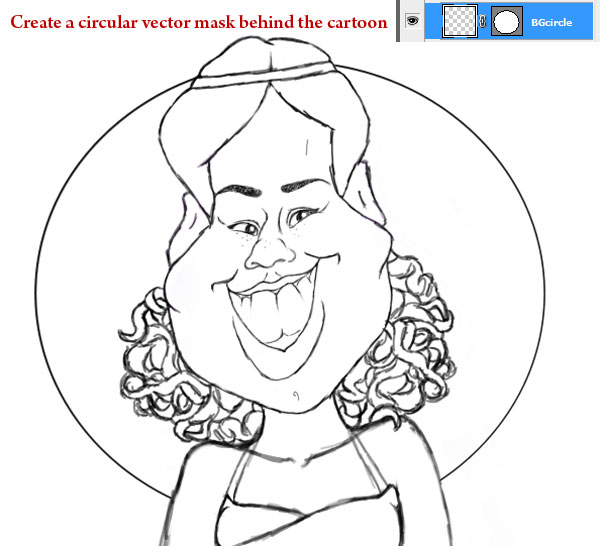
Step 6
You can create a theme around your cartoon as I did. Since the original caricature artist drew me from their point of view, this where I can add a little flair to make it my own. I love vintage lifestyle and fashion, so I incorporated it into the drawing by adding a flapper style headband and halter top.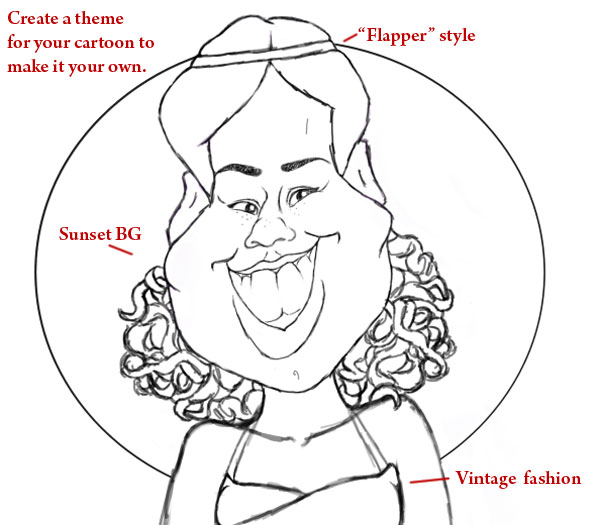
Step 7
I always start off with a base layer of solid color for my paintings. Add a new layer underneath the trace layer, taking a soft brush at full opacity to fill the cartoon with color. Add another new layer above the base, and use this layer to add more shape and definition to the cartoon while experimenting with color. Originally inspired by the warm, romantic colors of sunsets for the background, I wanted to keep this color scheme consistent with the rest of the painting.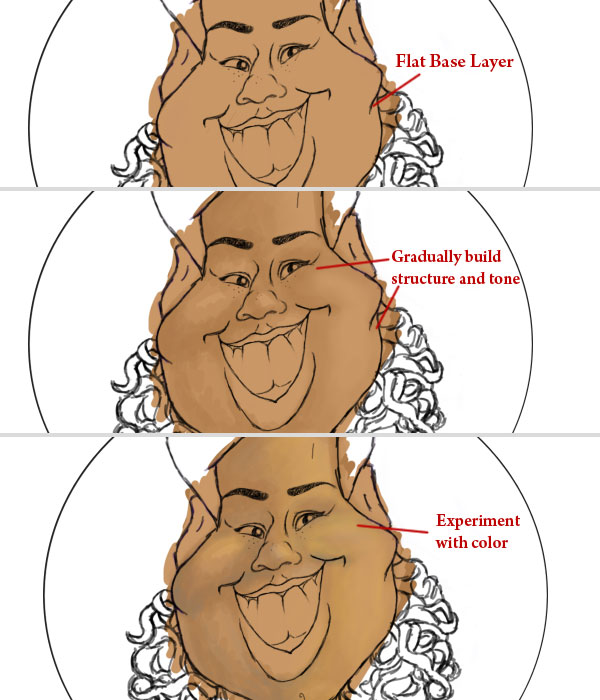
Step 8
I use mostly the standard round soft brushes at medium to low opacity to paint the character. For a smoother look, take the Smudge Tool at 50% strength and wiggle it over an area to blend the colors softly together.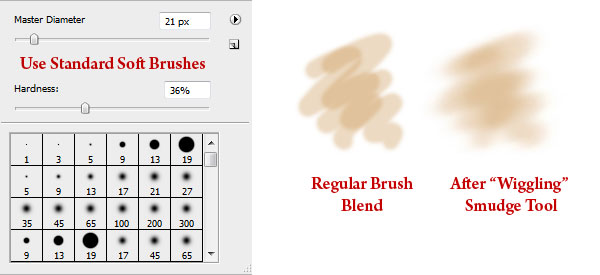
Step 9
Strive to become a conscious artist so that you can mold your artistic approach to what works. This is where we'll learn from my earlier mistakes and solutions. In this case, I realized that painting with a black sketch was distracting my eyes from building the shape of the cartoon. Using Layer Styles, set a Color Overlay to the sketch to reflect the color scheme. The sketch is only the initial guide to paint from and will be covered with color eventually, so don't stress over minimal adjustments like this.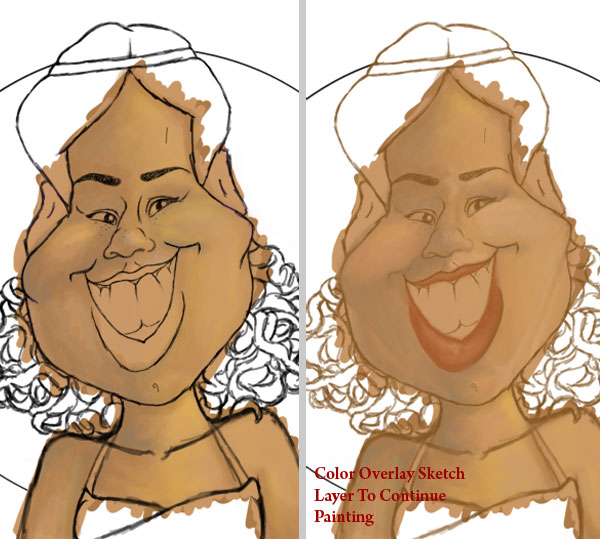
Step 10
If there is ever a point where your painting begins to look scary, stop and walk away. Most of my painting time is spent looking at it thoroughly to understand what will make it work. If you're still having problems, allowing another artist to see it with fresh eyes may reveal a solution. In this step I realized that the base color was showing through so intensely, that the color seemed too unnatural for skin tone. Select the Base Layer, and bring down the Opacity to 30%. Immediately the painting improved, and now I understand to build skin tone with less saturated colors in the future.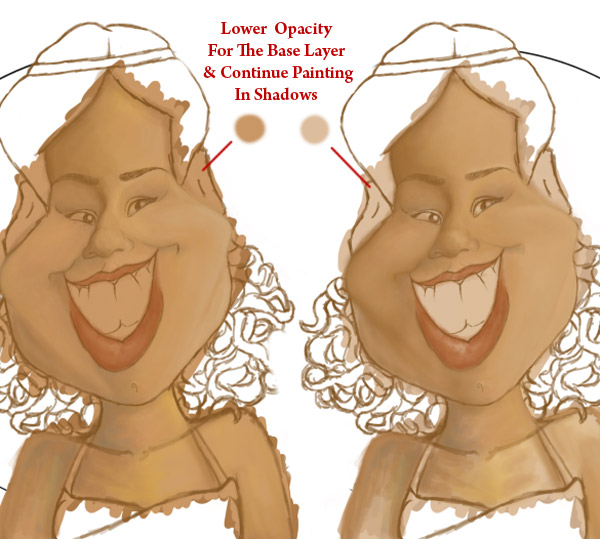
Step 11
Continue defining the rest of the face and bust. I spend most my time focusing on different tones and shadows of the character, waiting until the very end to add highlights. For "fleshier" areas of the female anatomy, refer to traditional techniques of how light falls upon round objects.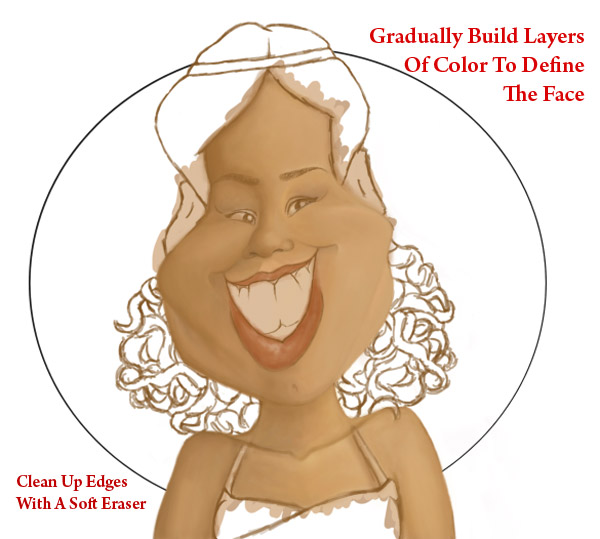
Step 12
Move onto the other features of your cartoon such as the eyes, mouth, ears, and hair. Pick a hard, standard round brush for the lips in order to add texture. Nothing on our body, at least from our outward appearance is ever a true white, so keep this in mind when painting the eyes and teeth. Fill in the hair with enough color so that we may quickly move onto the background.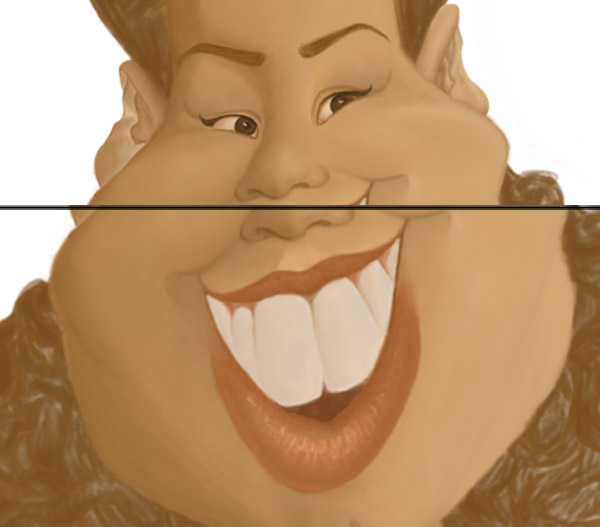
Step 13
As mentioned previously, I was inspired by sunsets for the circular background. Use a large grunge brush to paint warm hues for a textured sunset effect. On a new layer, take a small round brush and draw squiggles of varying opacity. Add a Gaussian Blur of 35.5 pixels for a subtle glowing effect. Using Layer Styles, add a #e4af88 Color Overlay to the background and set it to Hue.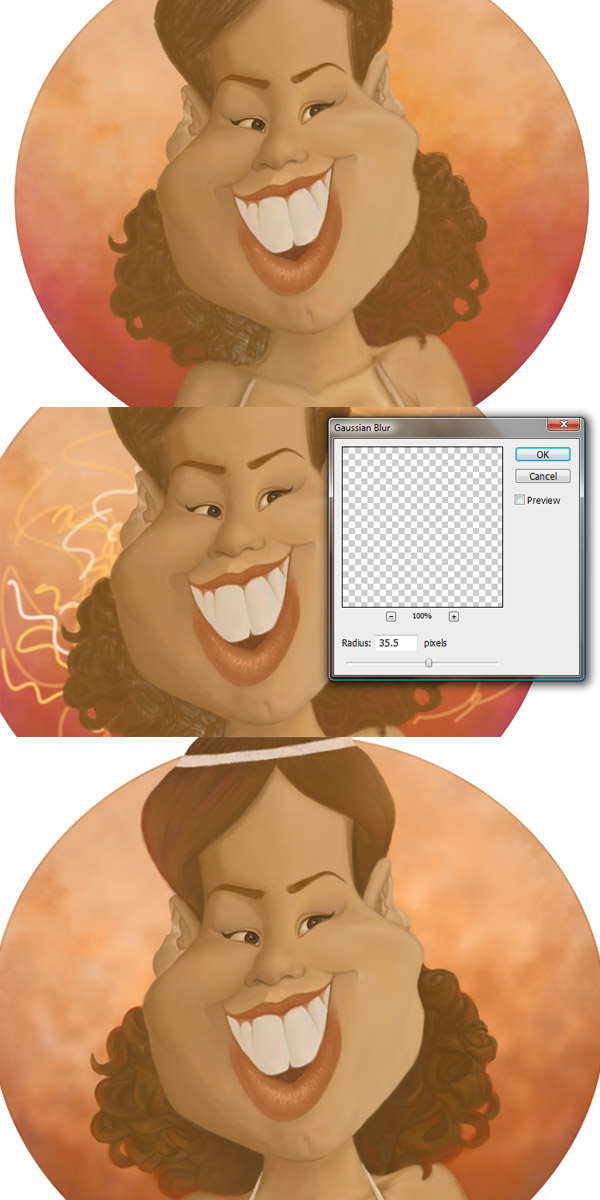
Step 14
Though painting in many layers helps with experimentation, you may merge those layers at any time to help with file size or slow computers. As we draw close to the finish, the only layers which dont have to be merged yet are the background, character, and clothing layers. Continue defining the cartoon's hair. Our bodies pick up color from our environment, so keep this in mind by adding touches of warm color to the hair. You can even paint a subtle glow to the tips using a vibrant color to make the hair more dynamic.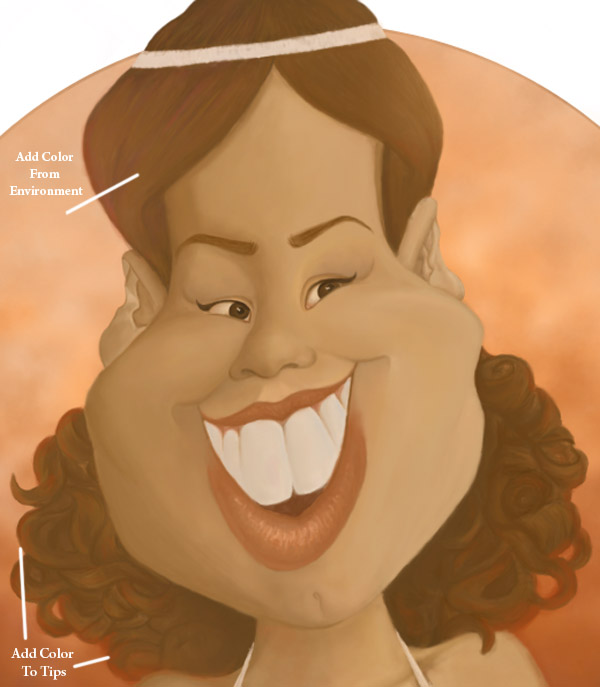
Step 15
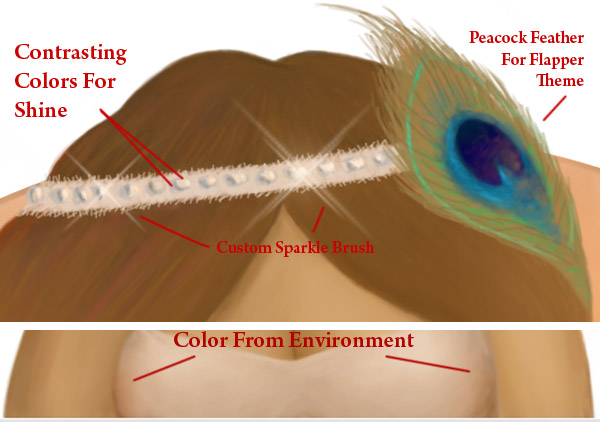
Next we'll move onto the clothing and accessories. Just like the hair, the halter top and headband should be affected in color by their environment. You can add a shiny element like the appearance of rhinestones by painting contrasting colors side by side. Use a custom brush to add sparkle to those rhinestones.To stay in theme, the peacock feather was an additional touch to pay homage to vintage flapper fashion.
Step 16
You can add further details to the cartoon's top and headband by painting material-like texture. Simply wiggling your pen stylus creates the appearance of lace, while adding strokes of texture to the headband creates the appearance of frayed edges.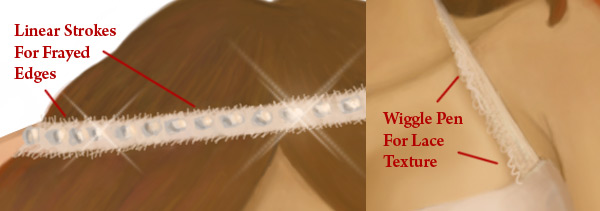
Step 17
Create a new layer for the highlights. The facial structure of the cartoon should be a clue to how the highlights fall upon the face. Use a bright peach color instead of white to reflect the sunset inspired color scheme. Place highlights on areas of the skin which poke out like the nose and cheeks, as well as areas in its directional path. Highlights often make their way into unpredictable places like edges of clothing, so feel free to experiment until you find what works.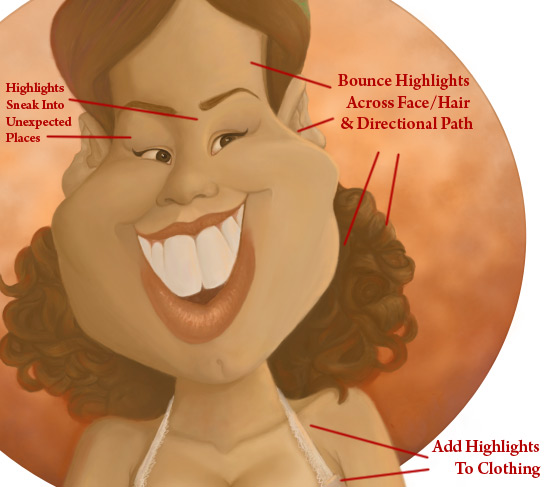
Conclusion
Add your signature to your digital masterpiece. Merge all the layers together and you have just finished revamping an old cartoon!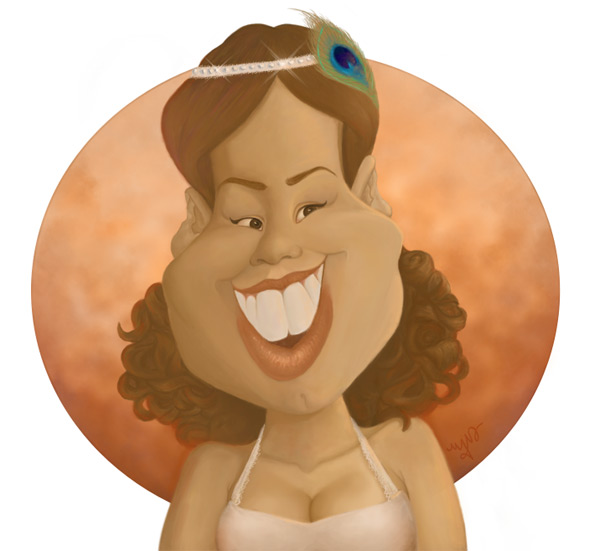
Melody Nieves 27 May, 2011
--
Source: http://psd.tutsplus.com/tutorials/painting/self-portrait-caricature/
~


0 komentar:
Posting Komentar
Ayo gan Komentarnya jangan lupa,,,biar tambah semangat yang upload Film dan Game dan berita juga update artikelnya, kalau ada link yang mati laporkan juga disini ya...